Newbie Guide (Part 1)
Newbie Guide (Part 2)
Starting Illyriad: An Alternative Newbie Guide
Do it your own way - the anti-guide
Tips for new players
City Development For New Players
Begging For Dummies
Basic Self Defense for New Players
Military for New Players
General Introduction
Mananan's Newbie Guide <<Start here
Tallica's Newbie Guide Part One
Tallica's
Newbie Guide Part Two
Auraya's Starting Illyriad
Rill's
Basic Self Defense for Newbies
The Illyriad Institute
City Settlement and Sovereignty
Basic Building Charts
Rill's
Where Do I Put My City
Skint Jagblade's
The Basics of City Placement
Auraya's
Teleport vs Exodus
GM Stromcrow's
Guide to Tenaril << newbies shouldn't Tenaril
Cerex Flikex'
Guide to Exodus
Vanerin's Guide to the Magical 7-food Mountain
Pink Camo's
Terraforming for Cheapskates
Mara Zia's Guide to Sovereignty
Gathering, Crafting, and Trade
GM Luna's Guide to Gathering <<start here
Rill's
Gathering: the Basics
Puzzle Logic
Graphic Guide to Gathering
Salarius' Crafting Guide
GM Luna's Crafting
Lissilene's So You Want to Learn to Craft?
GM Luna's Trading in Illyriad (for Dummies)
Armies and NPC Combat:
Admin's
Armies in Illyriad
Fluffy's
Everything you Need to Know About Commanders
Admin's
Combat
Kodabear's Battle Calculator
Rill's Quick Guide to Sieges
Ladyluvs' video
How to Siege
Admin's
Bestiary
Mananan's
NPC Difficulty Guide
Ubluntu's
Link to the Fortune Teller
http://forum.illyriad.co.uk/9-trade_topic3989.html

Good links:
Lady Fiona - Great basic game links.
Czarhollow's page - includes types of attack units you can build
Crafted Equipment Guide
Useful Crafting materials
Basic Hunting Guide Hunting and Elite Armies
Good crafting links
Durans Page
WAR charts.
And a good basic one
This is Illyriad, Welcome!
Let me introduce you to Illyriad, the first thing you should know is that Illyriad IS DIFFERENT! Now, if you're here that means you are new to the game. I'll tell you, Illyriad is a DEEP game with lots of different things to take in, so we'll start with
the basics here. So, what is Illyriad and how is it different? Illyriad is a perpetual game, which means the server we play on never ends or restarts, there is no winner or end-game. It is considered a 'sandbox' game, that is, you play how you want to play.
This causes Illyriad to be in a constant state of flux, where there is occasional conflicts, tournaments, and new content, keeping Illyriad unique and always interesting.
Anyway, let's start at the beginning, I recommend following this guide to help you out during your first week of the game:
Step 1: Do the in-game Tutorial and learn how to navigate
- Finish the tutorial if you have not, King Sigurd will send you a gift package during this and you will learn several of the basics of Illyriad
- Locate the Seals at the top of the window and notice that each has various Satellites under them (if you hover over a Seal the Satellites will be revealed)

- Click on the World Map Seal to view the map, locate the view slider, compass and “View Strategic Map” link

The slider will change the map zoom. By clicking on the points of the compass (N, NE, E, etc.) you can move the map (alternately you can drag the map or click a spot and “View Centered In Map” or click on the minimap), clicking the tower in the middle
will re-center the map on your town. Lastly, clicking “View Strategic Map” will show the entire map and allow you to see where certain things are on the map.
Once you have finished the Tutorial, you may notice this:  around the game, clicking these will open up a
short tutorial about whatever page you are on and can serve as a quick reminder on game mechanics. around the game, clicking these will open up a
short tutorial about whatever page you are on and can serve as a quick reminder on game mechanics.
Step 2: Change your taxes
- Click on your castle and go to the taxes tab, set your taxes to 0% which increases your resource production to 125%

The default for taxes is set at 25%, but you don't need gold yet. Notice how the resource production levels change as you move the tax slider. You can only change your taxes once every 24 hours. We are changing the taxes because what you need are resources
and a lot of them, doing this will give you a jump-start in the game.
Step 3: Speak up, we want to meet you!
- Locate Global Chat and introduce yourself, the Illyriad community is very generous and often sends gifts to new players (note: you can click on the window icon, little boxes, to enlarge the chat window)

- Check your incoming trades, if there is a blue box with a number in it, you have incoming trades

- Click the Movements Satellite (footprints) to see who sent you goods and what it is, then give a nice “Thank You” in Global Chat to the people who are sending you gifts
When speaking in Global Chat, try to stay in PG-rated mode. There is an auto-banhammer that will silence you for swearing, but there are also the sneaky GMs who like to lurk and crush players who aren't being civil in the chatroom.
Step 4: Better increase that storage...
- If you have inbound shipments, check to see if you can hold it all (look at how much is coming, then look at how much you can hold) by clicking on the Inventory Satellite (2 papers) and viewing Fill Levels

- Increase your Storehouse to level 3 (of course higher is better!)
A bit of advanced advice: try not to level your Storehouse past 15. At level 15 you unlock research that will allow you to build the superior Warehouse. Since there are limited build plots, you may someday choose to demolish that Storehouse and it would
be a terrible waste to build it up all the way to 20!
Step 5: Resources?
- Build your resource plots up toward level 7 (resource plots = Lumberyard, Clay Pit, Quarry and Iron Mine)
- Keep your resource production level equal (as you build up your resource plots, try to keep your income about the same for each of the 4 resources, we exclude food in this: explained later)

Notice that the top number is how much you have in storage and the bottom is your production per hour. When we talk about resources, we are talking about Wood, Clay, Iron and Stone, we exclude Food because it is used differently. The most common way of leveling
your resource plots is to focus on one of each type at a time: level 1 Lumberyard, level 1 Clay Pit, level 1 Quarry, level 1 Iron Mine, then on to level 2, 3, etc.
Step 6: Food acts differently?
- Food is not used for armies, it provides population
- Buildings have an upkeep in food that increases as you level them up, this upkeep is where your town's population comes from

- Keep your food production somewhere between 0 and 20 at all times (once you're larger this can change to 0 to 100)
The goal here is NOT to produce 1000s of food, but to keep your production level above 0. If your food goes into negative production, you need to build up a Farmyard right away! Otherwise, when your storage is empty of food your buildings will begin lowering
their levels, and you must avoid this at all costs!
Step 7: Protection? Armies? HELP ME!
- Newbie protection (the nice rainbow above your town) lasts for 7 days from when you started

- Check the time and day that it expires to know when you are no longer safe (found by clicking on your castle)

- DO NOT build an army to prepare for this protection expiration! If you find yourself being attacked (a red box will show above the Military Overview or Diplomatic Overview Seals) find help in Global Chat

What happens when protection goes away? Well, you can now be attacked, but most likely that won't happen. The reason you don't build an army is because the number of soldiers you can train is insignificant compared to what there is out there. Also, there
is little benefit to attacking a new player and the community really frowns upon bullying new players. If you do see one of those red boxes or get a message saying you've been robbed, find help in General Chat.
Step 8: Alliances
- You DO NOT need to join an Alliance, but you may if you wish to, locate the Alliance List Satellite (star) under the Alliances Overview Seal

- Research Alliances by finding players in Global Chat, the Alliance List or in the Illyriad Forums: Alliance Recruitment
If you find someone in Global Chat who you get along with, you can find if they are in an Alliance by clicking on their name. A mini window pops up and there will be an Alliance Ticker after their name (example: [RES]). In that same mini window you can click
on “View Alliance Profile” to see the alliance page that the player is a part of. Most Alliance Profiles will have contact info for the player who recruits for them. Send that person a mail if you wish to join their alliance.
Step 9: Week 1 Checklist
- Work toward these building levels in your first week:
Buildings:
Level 10 Storehouse, 3 Level 7 Lumberjack, 3 Level 7 Clay Pit, 3 Level 7 Quarry, 3 Level 7 Iron Mine, Level 10 Library, Level 10 Architect's Office, Level 5 Marketplace, Level 3 Mage Tower
-and- KEEP FOOD PRODUCTION POSITIVE!!!!
- Work toward these researches in your first week:
Research:
City: Timekeeping, Craftsmanship, Agriculture, Bureaucracy, Architecture, Pioneering, Bookbinding, Safeguard, Milling
Diplomacy: Negotiation
Quest: Brewing, Bartending
Magic: Arcana, Runes, Mark of Seeking, Mark of Slaying
Military: Militia
Trade: Haggling, Bartering, Improved Loading, Chain Gang, Cotters, Foraging, Grape Picking
Step 10: Last notes before Week 2
- Claim your Daily Log-In Bonus, locate The Herald Satellite (the H) under the World Map Seal, take the Free Prestige every day

- Keep your building queue full as much as possible, try to focus mostly on your resource plots (note: there are 2 “tiers” of buildings, these aren't noted in game, but some of the buildings have an upkeep of resources AND food, try not to build any of those
early on)
- Keep your research queue full as much as possible, locate the Research Tree Satellite (brackets) under the Research Seal

- Look around the World Map and you may see some NPC armies, these won't attack your towns but may be seen moving around the map (later when you build an army you will use these to train your commanders)

- There is a couple ways that you can move your town to somewhere else on the map, you may be tempted to do this early on, DON'T (it is recommended that you wait to move until you are ready to build your second town and have found an alliance, if you so
choose)
Congratulations!
You've made it through week one and are a fully-fledged newbie! Oh, don't be upset, we all started here, we all had many many questions (and all of us still have them!). Once you feel confident with the above material then you are ready for the...
(Click below)
Gathering in Illyriad
There are several different types of gathering in Illyriad. This information covers the basic differences and how to take part in each.
1) Caravan Harvesting (aka basic gathering)
Caravans can be used to gather goods outside of your city walls.
Minimum researches required: Haggling
Buildings required: Marketplace
Units required: Caravans (created in Marketplace)
Items that can be gathered this way:
 Food Food  Gold Gold  Wood Wood  Clay Clay  Iron Iron  Stone Stone
Carrying capacity: The carrying capacity of your caravans is determined by your depth of research in the Improved Loading line of research
Gathering speed: The gathering speed of your caravans is determined by your depth of research in the Chain Gang line of research
Limits: The number of caravans you can have in your town is determined by the level of your marketplace and the depth of your research in the Trading line of research
2) Cotter Harvesting (aka advanced gathering)
Cotters are used to collect certain special items outside of your city.
Minimum researches required: Haggling, Cotters, Foraging, Grape Picking
Buildings required: Marketplace, Cottage
Units required: Cotters (created in Marketplace)
Items that can be gathered this way:
 Grapes Grapes  Herbs Herbs  Hides Hides  Minerals Minerals
Carrying capacity: Each cotter can carry 100 items
Gathering speed: Each cotter will harvest at a rate of 5 per hour (7 per hour for humans) and will gather until their inventory is full, or they have exhausted the resource
Limits: The number of cotters you can have is determined by the number of cottages you have in your town. One cotter can be created per cottage and you can have multiple cottages in your town
3) Specialist Harvesting (aka skinning, herbalism, mining)
Specialist gatherers collect rare resources from throughout the world.
Minimum researches required: Haggling, Guilds, then depending on your chosen area of focus, Herbalists' Guilds & Herbalism, Miners's Guilds & Geology, Skinners' Guilds & Butchery
Buildings required: Marketplace, Herbalist' Guild and/or Miner's Guild and/or Skinner's Guild
Units required: Herbalist and/or Miner and/or Skinner (created in Marketplace)
Items that can be gathered this way:
 Rare Herbs (gathered by Herbalists) Rare Herbs (gathered by Herbalists)  Animal
Parts (gathered by Skinners) Animal
Parts (gathered by Skinners)  Rare Minerals (gathered by Miners) Rare Minerals (gathered by Miners)
Carrying capacity: Each specialist gatherer can carry 1 rare item
Gathering speed: Time it takes for the herbalist/miner/skinner to gather the items is dependent on the rarity of the item and will vary
Limits: The number of herbalists/miners/skinners you can have is determined by the level of their associated guild building, of which you can have multiples in your town
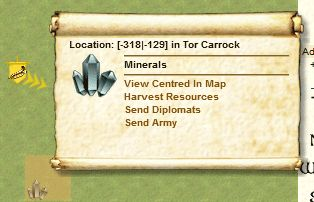
Step by step to gathering:
- Create the type of gatherer unit you'd like to use in your city
- Explore the world map for icons that display resources available on those squares (it may be helpful to turn off the map terrain feature to see them better)
- Click on the square on the map with a resource icon visible
- Choose "harvest resources" and send the appropriate unit to gather the type of resource available, using the information above
- The gatherer unit will then travel to the location and begin harvesting (movement speed to and from gathering squares can be sped up using prestige)
- Once they have landed on the square and begun harvesting, you will be able to see precisely which type of item your specialist gatherers (herbalists, miners and skinners) are harvesting on the Trade Movements page and in Notifications
- View their progress in harvesting on the Trade Movements page
- When they are finished, they will return home
- Check your notifications screen for important gathering-related information
Bumping, killing, over-harvesting and other useful information
Only one set, consisting of one type of gatherers can be on a single square at a time. This means, gatherers can be bumped off of a square they are working on by incoming gatherers that come in after them.
Gatherers harvest in parallel. So if you send 3 cotters to a square instead of 1, in the same amount of time the group will harvest 300 items rather than just the 100 that one cotter can carry.
Interrupted cotters will bring home what items they've completed gathering that are in their inventory.
Interrupted miners/skinners/herbalists will not bring home any items, because they are each only able to carry 1 item and will return home only after it is finished gathering.
Check your notification screen for all information about gatherer units including interruptions, notifications if they have died, items that they have gathered and information about what remains on the square after they've finished harvesting there.
Gatherer units can be attacked and killed by hostile armies. They can also be protected by NAP-ed armies on the same square.
Scout squares with resource icons on them to learn more about precisely what type of resource is present and in what quantity.
Herbs, rare herbs and grapes are living items, meaning once depleted from a square, they will not return. They will spawn again elsewhere. Harvest these items with care if you want them to stay put.
Minerals and rare minerals live at fixed locations. If the square is depleted they will respawn at that same square.
Hides and animal parts appear on squares where animals have been killed and will disappear once depleted.
Trading in Illyriad (for dummies)
There are 2 ways to trade goods in Illyriad. They function for different purposes and are used to sell different types of items.
Universal terms and features to be aware of:
Caravans: These move your goods from one place to another
Buy Orders: This is an order placed by a buyer who decides a price they are willing to pay for an item, and places an order on the market stating the price they are willing to pay, and how many of an item they want to purchase
Sell Orders: This is an order placed on the market by a seller who has an item and wants to sell it at a certain price and quantity

1) Marketplace Trading (aka Ebay w/o auctions)
Marketplace trades are sales that take place between one player to another directly to/from their towns. There is no middle-man in the transaction.
Minimum researches required: Haggling
Buildings required: Marketplace
Units required: Caravans (created in Marketplace)
Items that can be sold this way: Wood, Clay, Iron, Stone, Food, Horses (basic), Livestock, Beer, Books, Spears (basic), Swords (basic), Bows (basic), Saddles, Leather Armor (basic), Chainmail Armor (basic), Plate Armor (basic), Siege Blocks
Market visibility: As of August 9, 2012, all marketplace orders can be seen anywhere on the map by anyone. There are no visibility limits. This will change eventually.
Taxes paid: 7.5% paid by the person with the goods (not the person with the gold). Tax is not refunded if the order is cancelled.
Quantity purchasable: Buy and sell orders must be accepted in full
 
2) Trading Via Trade Hubs (aka the Mall)
Trade Hubs are buildings controlled by NPC factions, placed throughout the map. You can use these hubs to set up a store (like at the mall) to sell specialty items to people within a limited area.
Minimum researches required: Guilds, Merchant’s Guild, Faction Markets, Trader, Trade Office, Procurement, Selling
Buildings required: Merchant’s Guild, Trade Office, Marketplace
Units required: Caravans and Traders (created in the Marketplace)
Items that can be sold this way: All items in game (basic resources, advanced resources, gatherables, crafted items, wine, everything)
Market visibility: You can see all trade hub offers on the nearest friendly/neutral faction hub to your town, all hubs that fall into your marketplace’s visibility range (with which you have > -35 faction standing) as well as all trade hub
offers placed within hubs that you have a trader present.
Taxes paid: A percentage of tax is paid based upon your standing with the faction at the hub, paid by the person with the goods (not the person with the gold). Tax is not refunded if the order is cancelled.
Quantity purchasable: Buy and sell orders can be accepted in full or as partial orders

Step by step to using a trade hub:
- Research the required technologies
- Build a trader in your marketplace
- Choose a trade hub in which you’d like to place your trader (Important factors to consider are distance and faction standing)
- Click on the trade hub on the map and choose “send trader”
- Click on the trade hub on the map and choose “send resources” to send the items you’d like to sell on the market (Also send along gold to pay tax)
- Review the “Faction Trade Hubs” page in game to see your items stored at hubs
- Visit the “Markets and Prices” page to see available offers and place either a buy or sell order
- Choose “place sell order” or “place buy order,” select the items you like to sell/buy, choose hub or town, set quantity and price per item, select “check”
- Review the order, tax rate and caravans required, then select either “confirm” or “cancel”
- Visit the “Faction Trade Hubs” page (or locate your items in the “Markets and Prices” page) to review or cancel any of your orders

An example of a trade empire set-up using multiple towns:
Town A (Your Trading Town) researches all relevant trade technologies, builds a Trader (or Traders) and places them in hubs. This town becomes your center of commerce. Towns B (Mining), C (Herbalism), D (Crafting) all research only the Merchant’s Guild and
Faction Market technologies (with relation to advanced trade). They then harvest or craft their specialty goods and send them directly to the hubs that Town A has Traders within. Then the Trader(s) from Town A manage the sale of these goods on behalf of the
towns that sent them. All of your towns then work together in a seamless trade operation.
Things to know about Trade Hub Trading:
Once you have researched Faction Markets, you can send goods to trade hubs. Find the locations of the hubs on the Faction page. BUT if you do not have a Trader present at the hub, the goods will sit there unretrievable and un-usable by you until you get
a Trader there to interact with it. Storage is not limited.
Anyone who can see an offer on a Trade Hub can accept it. You can purchase sell orders and fill buy orders without a Trader in any hub.
You must have a Trader present in a Hub to make your own sell or buy orders on that market. Send a Trader to a hub by finding it on the map, clicking and choosing “send Trader.”
The cost to recruit additional Traders is account-based, not city based. Your first Trader, in the first town to create one, will not require Wine. The second trader (and any additional) will require Wine to produce, increasing with each trader. As Wine
requires effort to produce, and may be scarce, choose the city placement of your traders wisely.
If you have a faction standing of -35 or lower with a faction at a hub, they will not trade with you. Choose hubs with higher faction standing for better tax rates. Visit the individual faction pages to see your standing and any hubs connected to that faction.
There is currently (as of August 9, 2012) no way to change your faction standing.
Trader units have hourly gold upkeep costs.
Caravans are used to transport your goods to the trade hubs. They can then drop off the goods and come home. The person who purchases the goods from you will then use their own caravans to retrieve the goods from and transport gold to the hub.
Caravans can be sent to a hub to await orders.
Traders and caravans can be transferred from hub to hub directly, without having to come home first.
The number of buy orders you are able to place in trade hubs is determined by your Trade Office building level and the depth of your research in the Procurement line of research.
The number of sell orders you are able to place in trade hubs is determined by your Trade Office building level and the depth of your research in the Selling line of research.
Buildings In Illyriad
There are many city building types in Illyriad, and 5 resource gathering building types located outside the city wall. You only have 25 building plots per city though, so choose wisely and plan ahead.
Inside Your City
City Buildings

CASTLE
The Castle is the hub of your city. In the Castle you choose your city's name, see information about the city, set Taxation rates and view your city's Finances. With the right technologies researched, you can also demolish buildings, build settlers and upgrade
your city's defenses! Your castle is automatically built every time you settle a city.

LIBRARY
The library produces research points  for your city that you can turn into technology. Research points can be turned into technologies either on the
library "Research" page, or via the "Research Summary" at the top of your screen. You can also turn books into research points in your library's reading room. The number of research points generated per hour is dependent on the level of your library and the
current lunar phase. for your city that you can turn into technology. Research points can be turned into technologies either on the
library "Research" page, or via the "Research Summary" at the top of your screen. You can also turn books into research points in your library's reading room. The number of research points generated per hour is dependent on the level of your library and the
current lunar phase.

STOREHOUSE
The storehouse holds both basic and produced resources inside your city. Please note that the storehouse only stores your resources - it does not protect them from raids, attacks or thieves! For that you will need to build a vault. The capacity of the Storehouse
increases with each level of upgrade.

VAULT
The Vault secures a portion of your basic and produced items from prying fingers. The vault protects a fair number of basic resources, but only a limited supply of produced resources - so be careful how much stuff you have laying around in an unprotected
city! The capacity of the vault increases with each level of upgrade, up to a maximum of Level 20.

COMMON GROUND
The common ground is where your city's citizens raise livestock.  Livestock are used for a variety of purposes; most usually for the tanner to produce
leather armor and for the saddlemaker to produce saddles, but also for some of the darker spells, as sacrifices. The higher the level of common ground, the faster the production. Livestock are used for a variety of purposes; most usually for the tanner to produce
leather armor and for the saddlemaker to produce saddles, but also for some of the darker spells, as sacrifices. The higher the level of common ground, the faster the production.

PADDOCK
The paddock is where your city's citizens raise horses.  Horses are required for a number of different units that require either speed or heft - ranging
from all military cavalry types, most of the advanced diplomatic units, and large-scale wagon trains such as settlers. The higher the level of paddock, the faster the production. Horses are required for a number of different units that require either speed or heft - ranging
from all military cavalry types, most of the advanced diplomatic units, and large-scale wagon trains such as settlers. The higher the level of paddock, the faster the production.

TANNERY
The tanner is where you produce leather armor.  The tanner takes the hide from Livestock, cures, wrangles and dries it before layering it around mannequins
to form a durable protective sheath of leather. Upgrading the tanner increases the speed at which it produces. The tanner takes the hide from Livestock, cures, wrangles and dries it before layering it around mannequins
to form a durable protective sheath of leather. Upgrading the tanner increases the speed at which it produces.

SADDLEMAKER
The saddlemaker is where you produce saddles.  The saddlemaker uses the finest quality leather from livestock hides, and expertly crafts it into supple
but strong items of cavalry tack such as saddles, reins and blinkers. Upgrading the saddlemaker increases the speed at which it produces. The saddlemaker uses the finest quality leather from livestock hides, and expertly crafts it into supple
but strong items of cavalry tack such as saddles, reins and blinkers. Upgrading the saddlemaker increases the speed at which it produces.

SPEARMAKER
The spearmaker is where you produce spears.  Not simply a pointy stick, making a proper spear is an expert job. The spearmaker takes carefully hardened
wood and turns it until it is as strong as possible, before binding metal bands and a metal tip to the spear. Upgrading the spearmaker increases the speed at which it produces. Not simply a pointy stick, making a proper spear is an expert job. The spearmaker takes carefully hardened
wood and turns it until it is as strong as possible, before binding metal bands and a metal tip to the spear. Upgrading the spearmaker increases the speed at which it produces.

FLETCHER
The fletcher is where you produce bows  , arrows and archery equipment. Master craftsmen of wood gently shape great arcs of yew into perfectly balanced bows,
whilst their apprentices practice the art of fletching arrows so they fly as straight and true as humanly possible. Upgrading the fletcher increases the speed at which it produces. , arrows and archery equipment. Master craftsmen of wood gently shape great arcs of yew into perfectly balanced bows,
whilst their apprentices practice the art of fletching arrows so they fly as straight and true as humanly possible. Upgrading the fletcher increases the speed at which it produces.

BLACKSMITH
The blacksmith is where you produce swords  and chainmail armor. and chainmail armor.  Skilled
blacksmiths work diligently to produce the best weapons and armour for your troops to use and wear. Upgrading the blacksmith increases the speed at which it produces. Skilled
blacksmiths work diligently to produce the best weapons and armour for your troops to use and wear. Upgrading the blacksmith increases the speed at which it produces.

FORGE
The Forge is where you produce plate steel armor.  When your blacksmiths are ready, they will be prepared to band together and build a forge. In the hottest
fires of the forge, the finest and strongest plate steel is melded to produce incredibly durable suits of armour for your troops. Upgrading the forge increases the speed at which it produces. When your blacksmiths are ready, they will be prepared to band together and build a forge. In the hottest
fires of the forge, the finest and strongest plate steel is melded to produce incredibly durable suits of armour for your troops. Upgrading the forge increases the speed at which it produces.

SIEGE WORKSHOP
The Siege Workshop is where you produce siege blocks.  Siege blocks are vital for making Illyriad's largest weapons of war - from catapults and ballistas
to battering rams and siege towers. Upgrading the siege workshop increases the speed at which it produces. Siege blocks are vital for making Illyriad's largest weapons of war - from catapults and ballistas
to battering rams and siege towers. Upgrading the siege workshop increases the speed at which it produces.

BOOK BINDER
The book binder is where you produce books.  Books are incredibly laborious to produce, but critical for almost every spellcasting activity and for any
kind of knowledge transfer to another city, where they can be read and transferred into research points. Upgrading the book binder increases the speed at which it produces. Books are incredibly laborious to produce, but critical for almost every spellcasting activity and for any
kind of knowledge transfer to another city, where they can be read and transferred into research points. Upgrading the book binder increases the speed at which it produces.

CARPENTRY
The Carpentry increases the city's wood capabilities. The skill displayed as a proper craftsman shapes, moulds and finishes a raw piece of timber is a joy to watch. The carpentry improves your entire wood production by 2% per level.

KILN
The Kiln increases the city's clay capabilities. The potter takes your raw clay and fires dozens of useful items in the kiln - the foremost of which is bricks. These bricks are then used to make your supplies of clay go further in construction projects. The
Kiln improves your entire clay production by 2% per level.

FOUNDRY
The foundry increases the city's iron capabilities. The foundry further refines raw iron into different grades - some suitable for agriculture, others suitable for weaponry. The foundry improves your entire iron production
by 2% per level.

STONEMASON
The stonemason increases the city's stone capabilities. Stonemasons are expert craftsmen with all the various type of stone mined at your quarries. The stonemason carefully shapes each block into the exact requirements for a particular purpose,
and thereby reduces wastage. The stonemason improves your entire stone production by 2% per level.

FLOURMILL
The miller increases the city's food capabilities. It is a vital building for the later growth of your city. Constructing a mill to produce flour allows your citizens to make their own bread, and therefore increases the raw amounts of Food
your city produces. The flourmill improves your entire food production by 2% per level.

ARCHITECT'S OFFICE
The Architects' Office will speed the construction time of all your buildings and their upgrades by 1.5% per level.

WAREHOUSE
The Warehouse is an upgraded version of the Storehouse, and works in tandem with it to stockpile your city's resources. Warehouses can hold significantly more goods than storehouses can, but equally they do cost a lot more to build.
Diplomacy Buildings

CONSULATE
The consulate is where you perform various diplomatic tasks. This building produces all of your diplomatic units, from scouts, spies and saboteurs to thieves, assassins and envoys. You dispatch your diplomatic units on their missions from the "orders" drop
down from the diplomatic overview at the top of the screen. In an Alliance context, the level of consulate in the Alliance capital city determines how many members that Alliance can support. Upgrading the consulate gives you access to new technologies.

FOREIGN OFFICE
The Foreign Office provides support and infrastructure to enable your city to identify and track foreign diplomats more efficiently. You may build this building multiple times; however, each subsequent building costs the same but performs half as effectively
as before (2nd building = half, 3rd building = quarter). It provides 10% per level increase in diplomatic unit visibility from this town.

THIEVES DEN
Thieves have to continuously practice their arts, be they breaking and entering, moving quietly, removing items unnoticed or making a swift getaway.This building helps your thieves perfect all these skills, and means they don't have to spend their own time
and money on practice. You may build this building multiple times; however, each subsequent building costs the same but performs half as effectively as before (2nd building = half, 3rd building = quarter). It provides 1.5% per level upkeep reduction for Thief
units.

SABOTEUR'S SANCTUARY
Undermining foundations, stealing research and burning things down seems like it should be an easy task. Far from it! This building allows your Saboteurs to rest and recuperate their destructive energies. You may build this building multiple times; however,
each subsequent building costs the same but performs half as effectively as before (2nd building = half, 3rd building = quarter). It provides 1.5% per level upkeep reduction for Saboteur units.

ASSASSINS' ABODE
After a hard night of murdering, even assassins need somewhere to kip. The Assassins' Abode provides a safe refuge for your evil-doing well-wishers to recharge and refresh themselves before their next operation. You may build this building multiple times;
however, each subsequent building costs the same but performs half as effectively as before (2nd building = half, 3rd building = quarter). It provides 1.5% per level upkeep reduction for Assassin units.

SPIES' HIDEOUT
Spies need to blend into their surroundings seamlessly. Having a refuge where they can hone the art of disguise and misdirection at the city's expense is a godsend. You may build this building multiple times; however, each subsequent building costs the
same but performs half as effectively as before (2nd building = half, 3rd building = quarter). It provides 1.5% per level upkeep reduction for Spy units.

SCOUT'S LOOKOUT
Scouts spend an awful lot of time away from home, and not having to maintain their own dwellings, knowing that them and their families are being look after well in your city, means that they're willing to forego some of their pay whilst they're abroad. You
may build this building multiple times; however, each subsequent building costs the same but performs half as effectively as before (2nd building = half, 3rd building = quarter). It provides 1.5% per level upkeep reduction for Scout units.
Quest Buildings

BREWERY
The brewery is where you make beer  for consumption in your city. Beer is used in the tavern for loosening the tongues of those who might have some tasks
(quests) for you. It is also used in the recruitment of some of the thirstier military units. Upgrading the brewery increases the speed at which Beer is produced. for consumption in your city. Beer is used in the tavern for loosening the tongues of those who might have some tasks
(quests) for you. It is also used in the recruitment of some of the thirstier military units. Upgrading the brewery increases the speed at which Beer is produced.

TAVERN
The Tavern is where you can pick up quests to perform. For the small price of a few pints, you might overhear a conversation of interest to you, possibly something you can take advantage of. To accept a new quest go to the "quest" drop down menu from the
world map. Upgrading the tavern increases the speed at which quests cycle after completion, as well as giving you more time to complete each quest.
Magic Buildings

MAGE TOWER
The mage tower produces mana  for your city's mages to use in spells. All spells cost mana to cast, and many of them also cost mana to upkeep. Most spells
also cost other resources to cast - especially books. You cast spells - if you have researched them - by choosing "cast spell" on the magic menu at the top of the screen. The amount of mana generated in your town increases with every level of upgrade to the
mage tower. The amount generated is also effected by the current lunar phase. for your city's mages to use in spells. All spells cost mana to cast, and many of them also cost mana to upkeep. Most spells
also cost other resources to cast - especially books. You cast spells - if you have researched them - by choosing "cast spell" on the magic menu at the top of the screen. The amount of mana generated in your town increases with every level of upgrade to the
mage tower. The amount generated is also effected by the current lunar phase.

GEOMANCER'S RETREAT
Geomancers spend a huge amount of their time communing and becoming at one with nature and the natural spirits that bind the land together. The mental energies consumed by this process are greatly replenished by this purpose-built retreat. The bonus this
building provides is applied to the new spell's default. So a spell providing a +8% bonus to your resource production, cast with a single Level 20 Geomancers Retreat (+5% x 20 = +100%) would be cast with a total bonus of +16% bonus to resource production. You
may build this building multiple times; however, each subsequent building costs the same but performs half as effectively as before (2nd building = half, 3rd building = quarter). It increases Geomancy spell bonus by 5% per level.

RUNEMASTER'S GROUNDING
This building acts as a research centre and testing ground for your expert Runemasters to perfect their skills in Runeweaving, by providing a safe and comfortable environment for them to tinker with the intricate patterns and materials used in Rune construction. The
increase in charges provided by the additional preparation of your Runemasters is only applied to newly cast Runes, not existing Runes. You may build this building multiple times; however, each subsequent building costs the same but performs half as effectively
as before (2nd building = half, 3rd building = quarter). It increases number of rune charges by 5% per level.
Military Buildings

BARRACKS
The barracks is where you billet your army when they are at home. In the barracks, you produce troops and commanders and choose the composition of your armies and divisions. You also level up your commanders here, and use the "Move" screen to send those
armies out around the map.

SPEARMEN'S BILLETS
Spearmen know they're the most expendable part of a fighting force, and they're determined not to be expended. The Spearmens' Billets allows them to practice their deadly craft, as well as allowing your city to take care of some of their day-to-day needs. You
may build this building multiple times; however, each subsequent building costs the same but performs half as effectively as before (2nd building = half, 3rd building = quarter). It provides 1.5% per level upkeep reduction for Spear units.

INFANTRY QUARTERS
Infantry are the backbone of the army. Cameraderie, as well as skills, are honed to a sharp point when they're living and practicing together in the Infantry Quarters building. You may build this building multiple times; however, each subsequent building
costs the same but performs half as effectively as before (2nd building = half, 3rd building = quarter). It provides 1.5% per level upkeep reduction for Infantry units.

CAVALRY PARADE GROUND
Cavalry see themselves as the elite, the standard-bearers, of the military. The Cavalry Parade Ground provides them with their own place to practice handling and dressage skills, as well as a place - funded by your town - to live, eat and sleep. You may
build this building multiple times; however, each subsequent building costs the same but performs half as effectively as before (2nd building = half, 3rd building = quarter). It provides 1.5% per level upkeep reduction for Cavalry units.

ARCHER'S FIELD
Archers need to reach a peak of mental and physical perfection where they are 'at one' with the target. This is incredibly hard to achieve when they're quartered with the general melee of the army, and so the Archers' Field provides them a place both to
practice and also live without worrying about the world outside. You may build this building multiple times; however, each subsequent building costs the same but performs half as effectively as before (2nd building = half, 3rd building = quarter). It provides
1.5% per level upkeep reduction for Ranged units.

ARCTIC WARFARE COLLEGE
The Arctic Warfare College increases both the attack and defense abilities of all military troops produced by this town when fighting in this major biome by 1% per level of the building. You may build this building multiple times; however, each subsequent
building costs the same but performs half as effectively as before (2nd building = half, 3rd building = quarter). It provides 1% per level atk and def bonus to troops fighting in Arctic biome.

DESERT WARFARE COLLEGE
The Desert Warfare College increases both the attack and defense abilities of all military troops produced by this town when fighting in this major biome by 1% per level of the building. You may build this building multiple times; however, each subsequent
building costs the same but performs half as effectively as before (2nd building = half, 3rd building = quarter). It provides 1% per level atk and def bonus to troops fighting in Desert biome.

JUNGLE WARFARE COLLEGE
The Jungle Warfare College increases both the attack and defense abilities of all military troops produced by this town when fighting in this major biome by 1% per level of the building. You may build this building multiple times; however, each subsequent
building costs the same but performs half as effectively as before (2nd building = half, 3rd building = quarter). It provides 1% per level atk and def bonus to troops fighting in Jungle biome.
Trade Buildings

MARKETPLACE
The marketplace is where you build trade caravans and perform your trade functions. Use the drop downs from the trade overview window at the top of the page to offer your resources for sale, view other people's resources for sale, and generally manage the
dispatch and receipt of resources to and from other players. Upgrading the marketplace gives you access to more caravans, as well as the ability to carry more advanced types of goods.
Sovereignty Buildings

CHANCERY OF ESTATES
The Chancery of Estates helps administer your Sovereignty, keeping a registry of low-level claims and streamlining the process for your vassals. Any ruler who wishes to lay claim to a lot of land around their city would be wise to make this building a priority. You
may build this building multiple times; however, each subsequent building costs the same but performs half as effectively as before (2nd building = half, 3rd building = quarter). It provides a 2% discount to L1 Sovereignty claim cost only, per building level.
Outside Your City: Resource Gathering

LUMBERJACK
Produces wood  for your town. At level 0 this building produces 2 wood, just to make sure you always have some income! This produces more wood with
every level of upgrade, and can be upgraded to a maximum Level 20. for your town. At level 0 this building produces 2 wood, just to make sure you always have some income! This produces more wood with
every level of upgrade, and can be upgraded to a maximum Level 20.

CLAY PIT
Produces clay  for your town. At level 0 this building produces 2 clay, just to make sure you always have some income! This produces more clay with
every level of upgrade, and can be upgraded to a maximum Level 20. for your town. At level 0 this building produces 2 clay, just to make sure you always have some income! This produces more clay with
every level of upgrade, and can be upgraded to a maximum Level 20.

IRON MINE
Produces iron  for your town. At level 0 this building produces 2 iron, just to make sure you always have some income! This produces more iron with
every level of upgrade, and can be upgraded to a maximum Level 20. for your town. At level 0 this building produces 2 iron, just to make sure you always have some income! This produces more iron with
every level of upgrade, and can be upgraded to a maximum Level 20.

QUARRY
Produces stone  for your town. At level 0 this building produces 2 stone, just to make sure you always have some income! This produces more stone
with every level of upgrade, and can be upgraded to a maximum Level 20. for your town. At level 0 this building produces 2 stone, just to make sure you always have some income! This produces more stone
with every level of upgrade, and can be upgraded to a maximum Level 20.

FARMYARD
Produces food  for your town. At level 0 this building produces 2 food, just to make sure you always have some income! This produces more food with
every level of upgrade, and can be upgraded to a maximum Level 20. for your town. At level 0 this building produces 2 food, just to make sure you always have some income! This produces more food with
every level of upgrade, and can be upgraded to a maximum Level 20.
|


 around the game, clicking these will open up a
short tutorial about whatever page you are on and can serve as a quick reminder on game mechanics.
around the game, clicking these will open up a
short tutorial about whatever page you are on and can serve as a quick reminder on game mechanics.


 Grapes
  Herbs
Herbs  Hides
Hides  Minerals
 Rare Herbs (gathered by Herbalists)
  Animal
Parts (gathered by Skinners)
Animal
Parts (gathered by Skinners)  Rare Minerals (gathered by Miners)


